Introduction
Munin is a system, network, and infrastructure monitoring application that provides information in graphs through a web browser. It is designed around a client-server architecture and can be configured to monitor the machine it’s installed on (the Munin master) and any number of client machines, which in Munin parlance, are called Munin nodes.
In this article, we’ll install and configure Munin to monitor the server it’s installed on and one node. To install Munin on multiple nodes, just follow the instructions for creating a node on each system.
Prerequisites
- Two Ubuntu 14.04 Droplets. One of the servers will be the Munin master. The other will be the Munin node.
- For each Droplet, a non-root user with sudo privileges
All the commands in this tutorial should be run as a non-root user. If root access is required for the command, it will be preceded by sudo. Initial Server Setup with Ubuntu 14.04 explains how to add users and give them sudo access.
Step 1 — Installing Required Packages
We will start working on the Munin master first. Before installing Munin, a few dependencies need to be installed.
Though Munin can function with most popular Web servers like Nginx and Lighttpd, it is, by default, designed to work with the Apache Web server. So be sure that Apache is installed and configured on the Munin master. If it’s not already installed, do so using:
- sudo apt-get update
- sudo apt-get install -y apache2 apache2-utils
To ensure that the dynazoom functionality, which is responsible for zooming into the generated graphs, work properly on click, install the following:
$ sudo apt-get install -y libcgi-fast-perl libapache2-mod-fcgid
After installing those two packages, the fcgid module should be enabled. To double-check, type:
$ /usr/sbin/apachectl -M | grep -i cgi
The output should be:
fcgid_module (shared)If the output is blank, then it’s not enabled. You may then enable it using:
$ sudo a2enmod fcgid
When executing the apachectl command, you can ignore the following warning:
Could not reliably determine the server's fully qualified domain name ...
Apache will still work with Munin with this warning.
The rest of the configuration that will make graph zooming work properly will be covered in Step 3.
Step 2 — Installing Munin on the Munin Master
Installation packages for Munin are available in the official Ubuntu repository, so they can be installed using the distribution’s package manager. In this step, you’ll install the Munin master package. The version in the repository is the latest stable release.
To install it to monitor the server it’s installed on, type:
$ sudo apt-get install -y munin
Step 3 — Configuring the Munin Master
Munin’s main configuration file munin.conf and other files required for it to function are in the /etc/munin directory and its sub-directories. In this step, we’ll modify the main configuration file for the Munin master and its Apache configuration apache.conf.
The main configuration file is made up of at least two sections — a global and at least one host section. Optionally, there can be a group section. Host and group sections start with their respective names in square brackets. This file contains variable definitions, directives that govern how Munin monitors servers and services, and which servers to monitor.
To begin, open the main configuration file:
- $ cd /etc/munin
- $ sudo nano munin.conf
Look for these lines and uncomment them — remove the # sign that precedes them. The dbdir stores all of the rrdfiles containing the actual monitoring information; htmldir stores the images and site files; logdirmaintains the logs; rundir holds the state files; and tmpldir is the location for the HTML templates. Be sure to change the htmldir from /var/cache/munin/www to your web directory. In this example, we’ll be using /var/www/munin:
dbdir     /var/lib/munin
htmldir   /var/www/munin
logdir    /var/log/munin
rundir    /var/run/munin

tmpldir /etc/munin/templates
Since the htmldir does not exist, let’s create and chown it so that it’s owned by the munin system user:
- sudo mkdir /var/www/munin
- sudo chown munin:munin /var/www/munin
Finally, in munin.conf, look for the first host tree. It defines how to access and monitor the host machine. It should read:
[localhost.localdomain]
    address 127.0.0.1
    use_node_name yes
Change the name of that tree to one that uniquely identifies the server. This the name that will be displayed in the Munin web interface. In this example, we’ll be using MuninMaster, but you could also use the server’s hostname:
[MuninMaster]
    address 127.0.0.1
    use_node_name yes
That’s all for the configuration file, so save and close it.
That’s all for the configuration file, so save and close it.
Within the same /etc/munin directory, the next file we’ll be modifying is apache.conf, which is Munin’s Apache configuration file. It is sym-linked to /etc/apache2/conf-available/munin.conf, which, in turn, is sym-linked to /etc/apache2/conf-enabled/munin.conf. To start modifying it, open it with nano:
- sudo nano apache.conf
At the very top of the file, modify the first line so that it reflects the htmldir path you specified in munin.conf and created previously. Based on the directory path used in this article, it should read as follows, which makes it so you can access Munin’s web interface by appending munin to the server’s IP address or domain hosted on the server:
Alias /munin /var/www/muninNext, look for the Directory section, and change the directory to /var/www/munin. Also comment out (or delete) the first four lines and then add two new directives so that it reads:
<Directory /var/www/munin>
        #Order allow,deny
        #Allow from localhost 127.0.0.0/8 ::1
        #Allow from all
        #Options None

        Require all granted
        Options FollowSymLinks SymLinksIfOwnerMatch

        ...

        ...

</Directory>
Look for the penultimate location section, comment out or delete the first two lines and add two new ones so that it reads:
<Location /munin-cgi/munin-cgi-graph>
        #Order allow,deny
        #Allow from localhost 127.0.0.0/8 ::1

        Require all granted
        Options FollowSymLinks SymLinksIfOwnerMatch

        ...

        ...

</Location>
Do the same to the last location section:
<Location /munin-cgi/munin-cgi-html>
        #Order allow,deny
        #Allow from localhost 127.0.0.0/8 ::1

        Require all granted
        Options FollowSymLinks SymLinksIfOwnerMatch

        ...

        ...

</Location>
Save and close the file. Then restart Apache and Munin.
sudo service apache2 restart
sudo service munin-node restart
You may now access Munin’s web interface by pointing your browser to server-ip-address/munin
for example: 110.x.x.188/munin (hit enter)
Step 4 — Adding a Node to Munin Master
In this step, we’ll show how to add a remote server (or node) to the Munin master so that you can monitor it within the same web interface. This involves modifying the Munin master’s configuration file to specify a host tree for the node. Then, you will need to install the Munin node package on the node and modify its configuration file so that it can be monitored by the Munin master.
Let’s start with the Munin node — the second Ubuntu Droplet you created.
Log into the Munin node, update the package database and install the Munin node package:
- sudo apt-get update
- sudo apt-get install -y munin-node
After the installation has completed successfully, the node’s configuration file should be in the /etc/munin directory. Open it with nano:
- sudo nano /etc/munin/munin-node.conf
Towards the middle of the file, look for an allow ^127.0.0.1$ line and modify it so that it reflects the IP address of the Munin master. Note that the IP address is in regex format, so assuming that the master server’s IP address is 123.46.78.100, the line should read as follows:
[label  /etc/munin/munin-node.conf}
allow ^123\.456\.78\.100$
Save and close the file. Then restart the Munin:
- sudo service munin-node restart
Back on the Munin master, open the main configuration file:
- sudo nano /etc/munin/munin.conf
All we need to do in this file is insert a host tree for the (remote) node. The easiest approach to that is to copy and modify the host tree of the master. Be sure to replace node-ip-address with the IP address of the node you are adding:
[MuninNode]
    address node-ip-address
    use_node_name yes
Save and close the file. Then restart Apache:
- sudo service apache2 restart
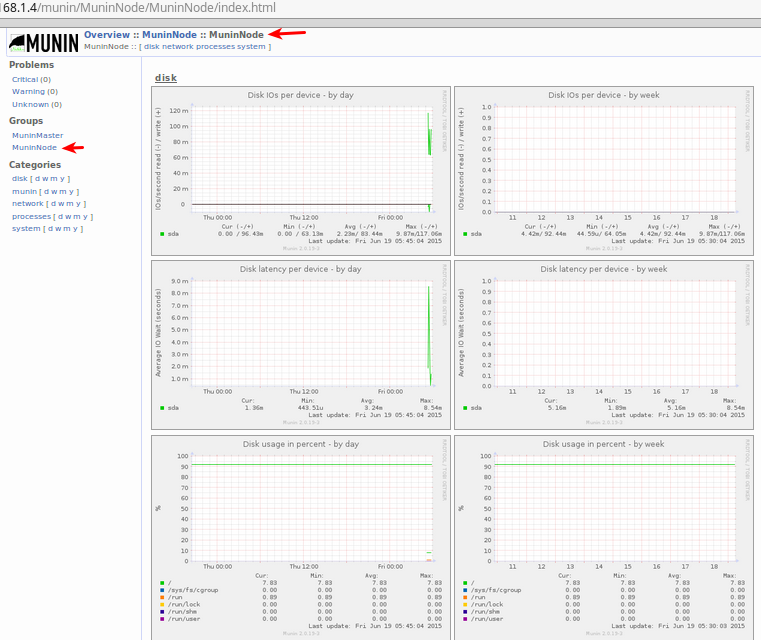
Munin checks for new nodes every 5 minutes. Wait a few minutes, and then reload the Munin master’s web interface. You should see an entry for the node. If you don’t see it yet, try again in 5 minutes. Using this method, you may add as many nodes as you have to monitor.
Setting Threshold values in /etc/munin/munin.conf file:
We can set the threshold values for available plugins inside /etc/munin/munin.conf file.
Under added node section please add threshold values as(we are adding threshold values for df plugin only) :
######################################################
[MuninSlave]
address 110.110.112.179
use_node_name yes
df._dev_sda1.warning(space)30
df._dev_sda1.critical(space)40
#######################################################
Step 5 — Enabling Extra Plugins
Munin monitors a system using plugin scripts, and by default, about a dozen set of plugins are installed and active. A complete list of available plugins are in the /usr/share/munin/plugins directory. To see which plugins can be used on your system, Munin provides the following command:
- sudo munin-node-configure –suggest
The output should be of this sort:
Plugin                     | Used | Suggestions
------                     | ---- | -----------
cps_                       | no   | no
cpu                        | yes  | yes
cpuspeed                   | no   | no [missing /sys/devices/system/cpu/cpu0/cpufreq/stats/time_in_state]
cupsys_pages               | no   | no [could not find logdir]
df                         | yes  | yes
df_inode                   | yes  | yes
fail2ban                   | no   | yes
ip_                        | no   | yes
A plugin with a yes in the Used column means just what it indicates, while one with a yes in the Suggestions column means it can be used. One with a no on both columns means it is not in use and cannot be used on the system. Finally, if a plugin has a no in the Used column and a yes in the Suggestions, then it is not being used but can be enabled and used on the system.
On the Munin master and node, you can also see a list of installed plugins in the /etc/munin/pluginsdirectory.
A munin-plugins-extra package should have been installed when you installed Munin. If it was not, do so using.
- sudo apt-get install munin-plugins-extra
To enable an available plugin that’s not currently in use, create a symbolic link for it from the /usr/share/munin/plugins directory to the /etc/munin/plugin directory.
For example, to enable the Fail2ban plugin, first install Fail2ban:
- sudo apt-get install fail2ban
Then, create the symlink that enables the Munin plugin:
- sudo ln -s /usr/share/munin/plugins/fail2ban /etc/munin/plugins
Restart Munin:
- sudo service munin-node restart
Wait a few minutes, reload the web interface, and you should see graphs for Fail2ban under the title Hosts blacklisted by fail2ban under the network category for the Munin master.
Troubleshooting
If you are having trouble configuring the Munin master, the Munin node, or getting the master to see the node, check out the log files for error messages:
- Munin master:
/var/log/munin/munin-update.log - Munin node:
/var/log/munin/munin-node.log
You can also check the project’s page for additional troubleshooting tips.
Sample content of /etc/munin/minin.conf file is:
############ start of file ########################
# Example configuration file for Munin, generated by ‘make build’
# The next three variables specifies where the location of the RRD
# databases, the HTML output, logs and the lock/pid files. They all
# must be writable by the user running munin-cron. They are all
# defaulted to the values you see here.
#
dbdir /var/lib/munin
htmldir /var/www/munin
logdir /var/log/munin
rundir /var/run/munin
# Where to look for the HTML templates
#
tmpldir /etc/munin/templates
# Where to look for the static www files
#
#staticdir /etc/munin/static
# temporary cgi files are here. note that it has to be writable by
# the cgi user (usually nobody or httpd).
#
# cgitmpdir /var/lib/munin/cgi-tmp
# (Exactly one) directory to include all files from.
includedir /etc/munin/munin-conf.d
# You can choose the time reference for “DERIVE” like graphs, and show
# “per minute”, “per hour” values instead of the default “per second”
#
#graph_period second
# Graphics files are generated either via cron or by a CGI process.
# See http://munin-monitoring.org/wiki/CgiHowto2 for more
# documentation.
# Since 2.0, munin-graph has been rewritten to use the cgi code.
# It is single threaded *by design* now.
#
#graph_strategy cron
# munin-cgi-graph is invoked by the web server up to very many times at the
# same time. This is not optimal since it results in high CPU and memory
# consumption to the degree that the system can thrash. Again the default is
# 6. Most likely the optimal number for max_cgi_graph_jobs is the same as
# max_graph_jobs.
#
#munin_cgi_graph_jobs 6
# If the automatic CGI url is wrong for your system override it here:
#
cgiurl_graph /munin-cgi/munin-cgi-graph
# max_size_x and max_size_y are the max size of images in pixel.
# Default is 4000. Do not make it too large otherwise RRD might use all
# RAM to generate the images.
#
#max_size_x 4000
#max_size_y 4000
# HTML files are normally generated by munin-html, no matter if the
# files are used or not. You can change this to on-demand generation
# by following the instructions in http://munin-monitoring.org/wiki/CgiHowto2
#
# Notes:
# – moving to CGI for HTML means you cannot have graph generated by cron.
# – cgi html has some bugs, mostly you still have to launch munin-html by hand
#
#html_strategy cron
# munin-update runs in parallel.
#
# The default max number of processes is 16, and is probably ok for you.
#
# If set too high, it might hit some process/ram/filedesc limits.
# If set too low, munin-update might take more than 5 min.
#
# If you want munin-update to not be parallel set it to 0.
#
#max_processes 16
# RRD updates are per default, performed directly on the rrd files.
# To reduce IO and enable the use of the rrdcached, uncomment it and set it to
# the location of the socket that rrdcached uses.
#
#rrdcached_socket /var/run/rrdcached.sock
# Drop somejuser@fnord.comm and anotheruser@blibb.comm an email everytime
# something changes (OK -> WARNING, CRITICAL -> OK, etc)
#contact.someuser.command mail -s “Munin notification” somejuser@fnord.comm
#contact.anotheruser.command mail -s “Munin notification” anotheruser@blibb.comm
#
# For those with Nagios, the following might come in handy. In addition,
# the services must be defined in the Nagios server as well.
#contact.nagios.command /usr/bin/send_nsca nagios.host.comm -c /etc/nsca.conf
contacts ubuntu
contact.ubuntu.command >”/etc/munin/externalscript”
# a simple host tree
[MuninMaster]
address 127.0.0.1
use_node_name yes
[MuninSlave]
address 110.110.112.179
use_node_name yes
#
# A more complex example of a host tree
#
## First our “normal” host.
# [fii.foo.com]
# address foo
#
## Then our other host…
# [fay.foo.com]
# address fay
#
## IPv6 host. note that the ip adress has to be in brackets
# [ip6.foo.com]
# address [2001::1234:1]
#
## Then we want totals…
# [foo.com;Totals] #Force it into the “foo.com”-domain…
# update no # Turn off data-fetching for this “host”.
#
# # The graph “load1”. We want to see the loads of both machines…
# # “fii=fii.foo.com:load.load” means “label=machine:graph.field”
# load1.graph_title Loads side by side
# load1.graph_order fii=fii.foo.com:load.load fay=fay.foo.com:load.load
#
# # The graph “load2”. Now we want them stacked on top of each other.
# load2.graph_title Loads on top of each other
# load2.dummy_field.stack fii=fii.foo.com:load.load fay=fay.foo.com:load.load
# load2.dummy_field.draw AREA # We want area instead the default LINE2.
# load2.dummy_field.label dummy # This is needed. Silly, really.
#
# # The graph “load3”. Now we want them summarised into one field
# load3.graph_title Loads summarised
# load3.combined_loads.sum fii.foo.com:load.load fay.foo.com:load.load
# load3.combined_loads.label Combined loads # Must be set, as this is
# # not a dummy field!
#
## …and on a side note, I want them listen in another order (default is
## alphabetically)
#
# # Since [foo.com] would be interpreted as a host in the domain “com”, we
# # specify that this is a domain by adding a semicolon.
# [foo.com;]
# node_order Totals fii.foo.com fay.foo.com
############## End Of File ###########################
Sample /usr/share/perl5/Munin/Master/LimitsOld.pm file content
*************** Start Of File ************************************
click on following link,you will get all content of LimitsOld.pm file
*************** End Of File *****************************************
Problem-1: munin logs are not generating properly:
solution:
When you installed munin first time then it will not generate logs properly.
For generating logs we need to make changes in /usr/share/perl5/Munin/Master/LimitsOld.pm file
after opening this file, just find the word ‘$DEBUG'(without single quotes) and check its value. If its value is zero(0) then we need to change it to 1.
$DEBUG = 0 …………original line present in /usr/share/perl5/Munin/Master/LimitsOld.pm file.
change it as :
$DEBUG = 1
after making this change , we need to wait for 5 minutes to see newly generated logs.
we can see the logs in /var/log/munin/munin-limits.log file.
or we can check it directly using following command:
$ tail -f /var/log/munin/munin-limits.log
Problem – 2 Unable to Update the graphs on Munin Dashboard:
Solution:
For resolving this problem, we need make a single change in /etc/munin/munin.conf file.
just open that file using vi editor and search for following line(which is commented out in default configuration):
#cgiurl_graph /munin-cgi/munin-cgi-graph
we need to only uncomment the above line from /etc/munin/munin.conf. Save it and close that file.
just restart the services like munin-node and apache2 using commands like:
- $ sudo service munin-node restart
- $ sudo service apache2 restart
Wait for 5 minutes to generate next logs and after 5 minutes you will get updated graphs on munin dashboard.
Problem-3: UpdateWorker is not working Properly:
Solution:
To find out error related to UpdateWorker, we need to check the updated log file (sudo vi /var/log/munin/munin-update.log). If we got error like following in that file:
******************************************************************************
2017/10/26 08:05:02 [ERROR] Munin::Master::UpdateWorker<MuninSlave;MuninSlave> died with ‘[FATAL] Socket read from MuninSlave failed. Terminating process. at /usr/share/perl5/Munin/Master/UpdateWorker.pm line 254.
******************************************************************************
for solving this type of problem we need to go with our munin configuration file i.e /etc/munin/munin.conf file.
this error comes because of setting threshold values wrongly(inside that munin.conf file)
following is wrong method for setting threshold values:
*********************** Start Of Section **********************
[MuninMaster]
address 127.x.x.1
use-node_name yes
df._dev_sda1.warning = 30
df._dev_sda1.critical = 40
************************* End Of Section ***************************
Following is correct method for setting threshold values:
*********************** Start Of Section **********************
[MuninMaster]
address 127.x.x.1
use-node_name yes
df._dev_sda1.warning 30
df._dev_sda1.critical 40
************************* End Of Section ***************************
after making this change we can see the UpdateWorker error is gone…..
and we can see the output like this……
*******************************************************************
2017/10/26 22:50:06 [INFO] Reaping Munin::Master::UpdateWorker<MuninSlave;MuninSlave>. Exit value/signal: 0/0
2017/10/26 22:50:06 [INFO] Reaping Munin::Master::UpdateWorker<MuninMaster;MuninMaster>. Exit value/signal: 0/0
*****************************************************************************
Where , ‘Exit value/signal: 0/0 ‘ means that everything is fine.
Event Handling In Munin:
If some service went into critical state,To handle these scenario we need to create or call an external script which can send mail to particular user and handle that occurred event.
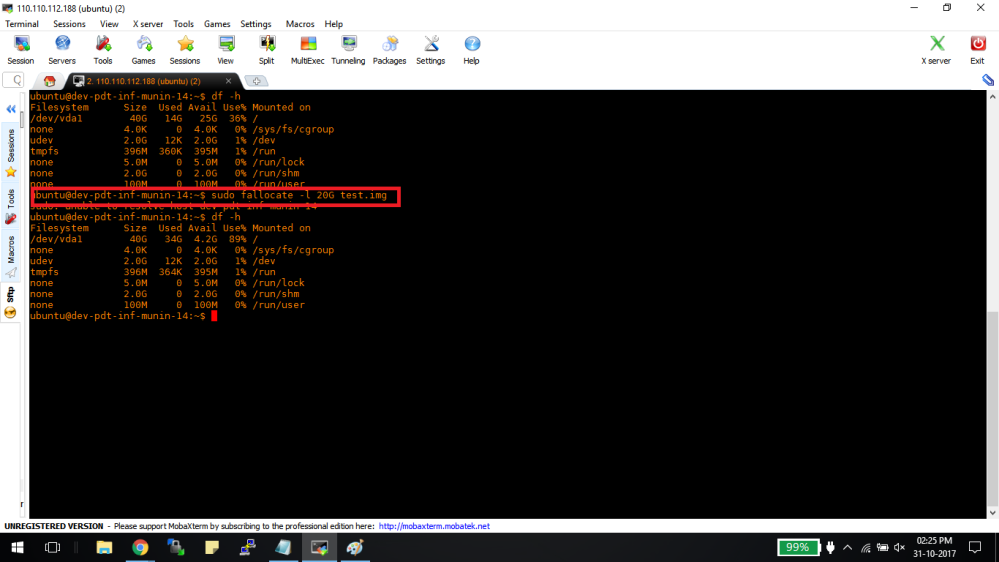
before making disk is in critical state,we need to check how much % disk is occuppied using following command:
- df -h
Output of above command is:

Here, Disk is occupied only 36%.
Now, we will make disk is in critical state by using following command on MuninMaster:
- sudo fallocate -l 25G /etc/munin/test.img
where,
25G —–>how much space you want to occupy.
test.img—–>name of that created file.
sample output of above command is:
After successful completion of above command,we need to run the following command to check how much % of disk is occupied:
- df -h
output of above command is:
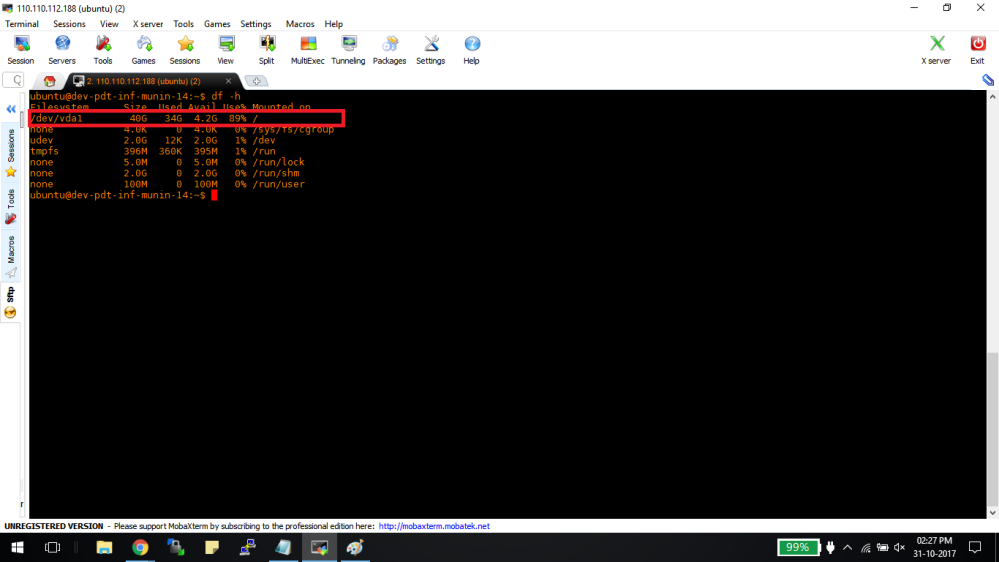
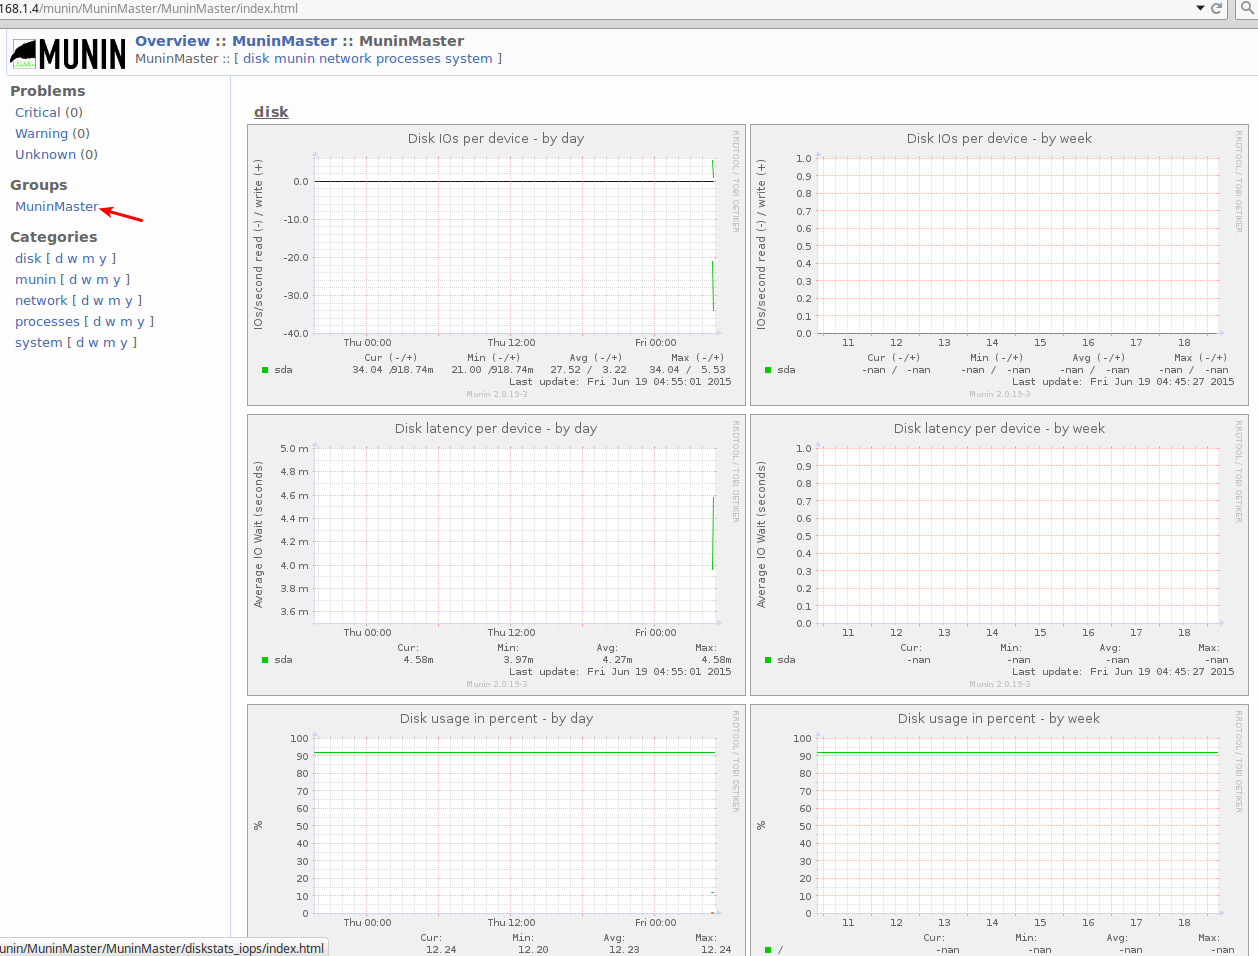
Now disk usage is in critical. Same thing we can see on munin dashboard as follows:
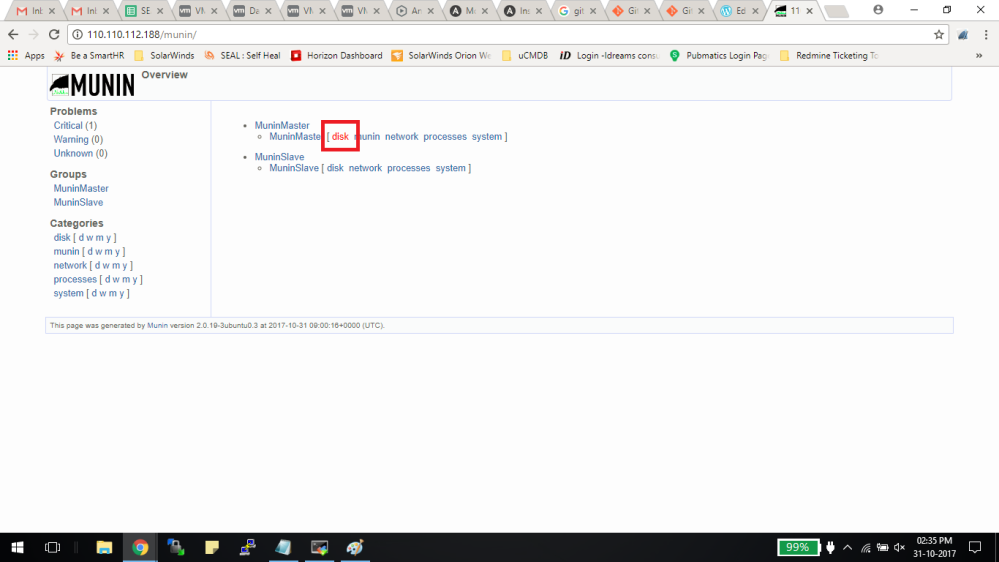
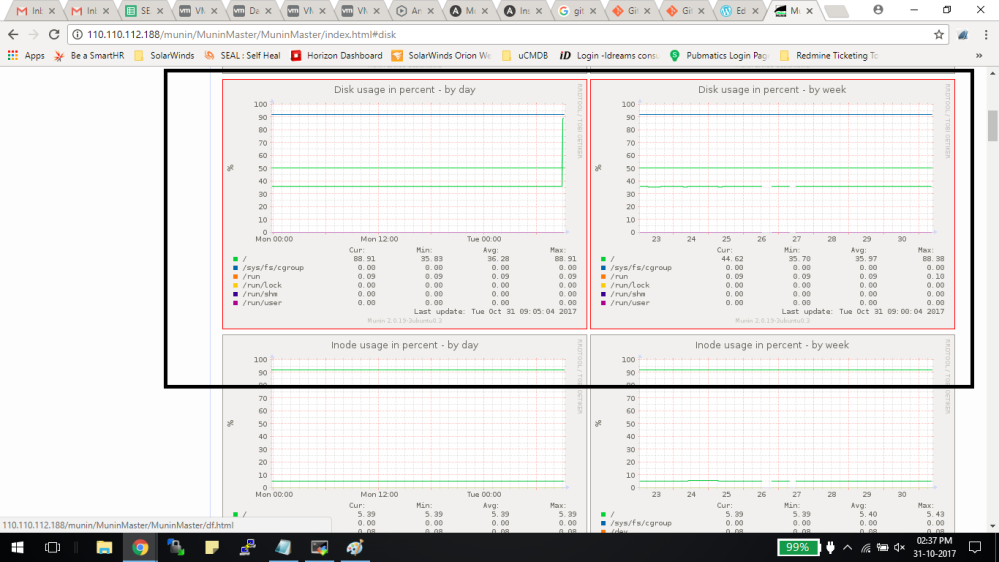
when we click on that red marked disk on munin dashboard, then we can see more elaborate graphs of disk :
Now we need to handle that disk event. For that we need to make some changes in to /etc/munin/munin.conf file on MuninMaster as follows(add the following lines to munin.conf):
#####################################################################
contacts(space)ubuntu root
contact.ubuntu.command(space)>(No space here)”path_ of_ur_externalscript”
####################################################################
where,
we need to add usernames(to contacts list)of ur machine(here,ubuntu and root are the users).So I added like “contacts(space)ubuntu root”.
And executing the external script by using path of that script like(contact.ubuntu.command(space)>(No space here)”path_ of_ur_externalscript”).
Now your /etc/munin/munin.conf file looking like this :
###########################################################
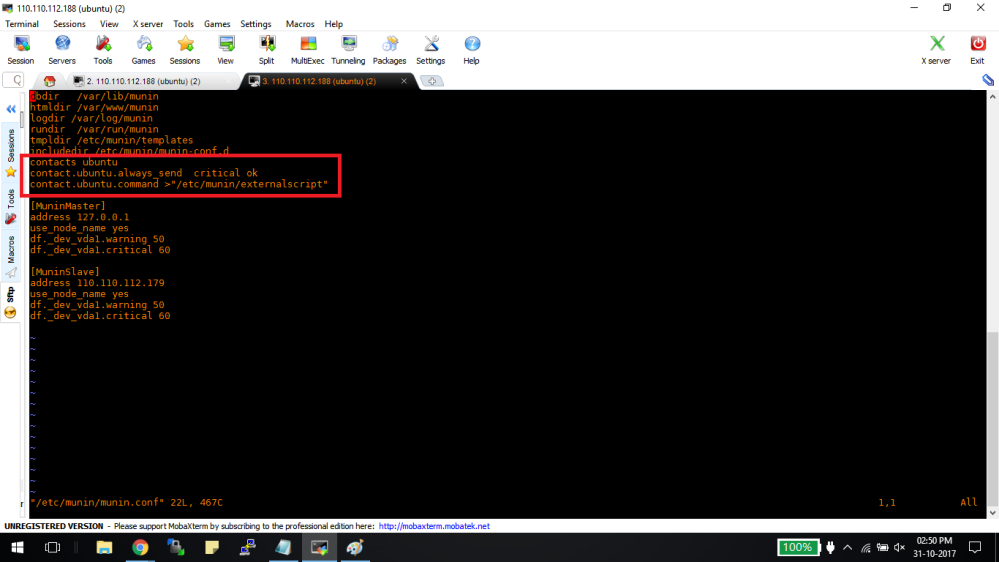
##################################################################
and content of sample externalscript is as follows script stored on path is “/etc/munin/externalscript”:
###################################################################
click on above link, we will get content of externalscript
###################################################################
when any service goes into critical then this externalscript will be called.
for handling the particular event, we need to write a script which deletes content of directories like ‘/tmp’,’/var/tmp’ and finally test.img file(which we created earlier).
Script for event handling:
###################################################################
#!/bin/bash
sudo rm -rf /var/tmp/*
sudo rm -rf /tmp/*
sudo rm -rf /etc/munin/test.img
###################################################################
when any service goes into critical then this externalscript will be called. and delete the temporary files and reduces the disk usage.
After every 5 minutes we can see the updated changes on munin dashboard i.e. on 110.x.x.188/munin as follows:
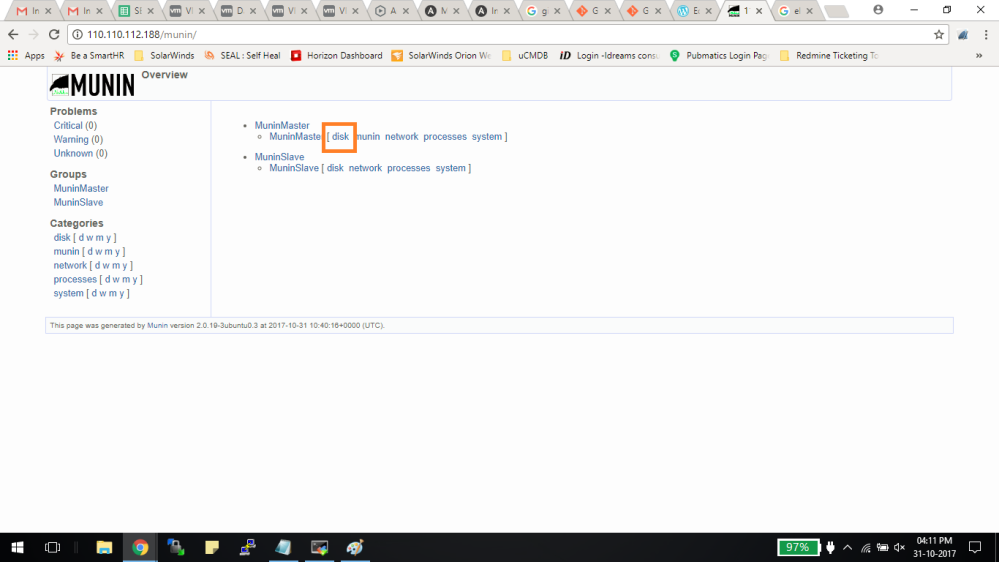
more elaborated view of disk of MuninMaster as:
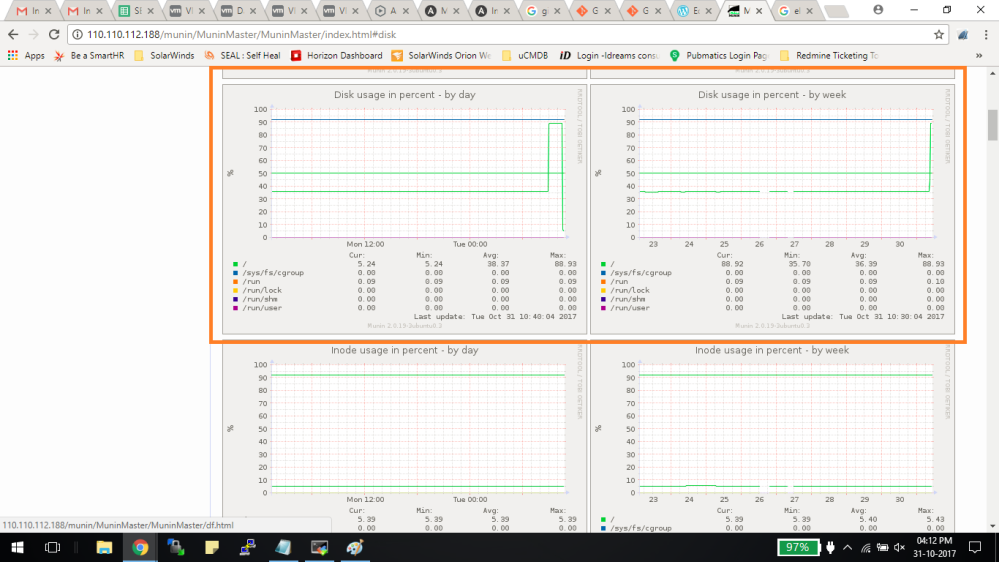
See the above snapshot, here we can see that disk is not in critical state.(after execution of externalscript).
Conclusion:
Munin can be configured to monitor the system on which it is installed. Adding remote servers to the monitored system is as simple as install the munin-node package on the remote server (or node) and then modifying the server’s and node’s configuration files to point to the other IP address.
Munin works by using plugins, but not all are enabled out of the box. Information about plugins are available on the project’s page.
